
How to Stencil on a Wall
/Hello friends,
I hope you're enjoying your summer so far! Mine has been busier than expected...but I'm still finding time to do a few of the things I love which include...being outside, long walks in the morning or evening, hanging out with friends, and of course....decorating!
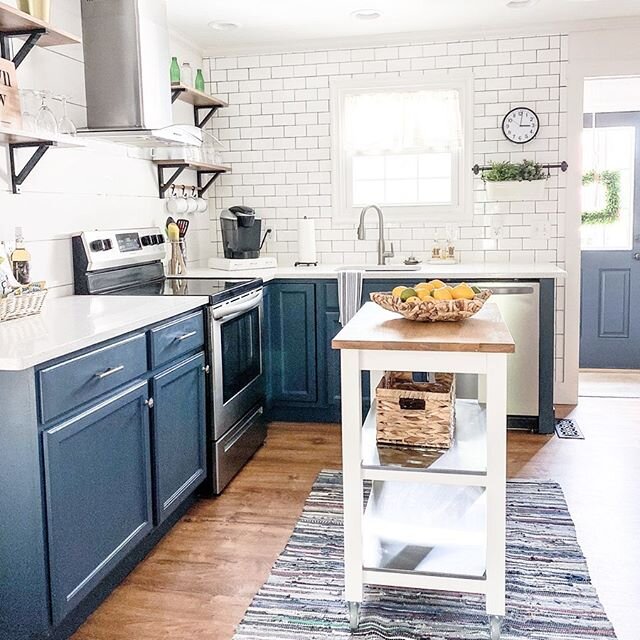
Recently, I did a little revamp in my Butler's Pantry. I will be honest and say that this little space is one of my favorites in my house because it is where we have our Keurig coffee pot and mugs...and I sure do love my coffee! It's a great space because it's tucked in between my kitchen and the dining room which makes it perfect for placing pots or empty bowls when entertaining.
I love this little space and I've felt like it could use some attention for awhile now but just didn't have the time or energy to do anything with it. It was pretty boring and I could envision it being so cute. I thought of wallpapering it since wallpaper is all the rage. However, I enjoy changing things up so I didn't want to invest in something so permanent for these walls! Can anyone else relate?
That's when I decided to try stenciling and so here's a brief tutorial on the steps I used and mistakes I made....
Supplies Needed:
1. Choose your stencil. I used a Royal Design Studio stencil. The pattern is: Art Deco Fanfare by Raven and Lilly. I highly recommend Royal Design Studio stencils because they are really durable and yet, easy to bend into corners. Their website is: https://www.royaldesignstudio.com and they always have great discounts!
2. Purchase a few stencil brushes. I used a larger one and a smaller one for the corners. I purchased these from Michaels.
3. Decide what color you want your stencil to be. I chose a chalkpaint from Lowe's: Valspar; color: Opera Gown - which is a slate blue color.
4. Other supplies: painter's tape or scotch tape (to hold the stencil in place), a paint pan (I place aluminum foil over mine which makes for easy clean-up), and a paper plate to wipe excess paint off your brush.
Steps:
1. Prep your walls - Clean and paint if necessary. The color of the wall is important as it will show through the stencil. I chose a lighter color on my walls and a darker paint but it would also be pretty to do a darker wall and a lighter paint.
2. Placement of stencil: Some of the tutorials I read said to place the stencil on the top, middle part of the wall so that is what I did. Some people recommend using adhesive spray on the back of the stencil but I opted for painter's tape and it worked fine.
3. Dip your brush in the paint and dab it on the paper plate so that the paint is slightly on the brush. Then, begin to tap the paint onto the stencil. It helps to hold the stencil with one hand while painting to ensure an even coat.
Once you have an even coat, pull the stencil off. Make sure there is no paint on the back of the stencil and if so, wipe it off before placing it over the wall again.
4. Continue to match the stencil with the pattern that runs throughout it and repeat the process.
5. Corners: Match the stencil from the side that is painted and bend the stencil into the corner. Keep your tape handy and quickly tape it using your other hand. I found that it worked well to just hold the stencil in the corner while painting. It's not as hard as it sounds!
6. If you mess up...like I did...just smile and wipe off the paint. If you use chalkpaint, it comes off pretty easily with a little water. I was getting lazy as you can see from this picture and started to get a little sloppy with my painting. That's when I took a coffee break and washed off the stencil to start afresh...after my break! :-)
7. Fill in any spaces that you may have missed. I used my smaller brush for this and matched the stencil over spaces like the corners where it needed a bit more paint.
8. A few other tips that I learned: I found it worked best to go across and then down the wall. Make sure you're keeping the stencil level so that you don't have a crooked print. If it goes off a little that's okay....just keep an eye on it! :-)
I really love this new look except that I didn't like how my cabinets went with my new stenciled walls. Oh boy! Well, one project leads to another so that will be my next blog....how to paint cabinets using chalk paint. Stay tuned, dear friends! The decorating saga continues....
If you decide to try stenciling your walls and have questions...feel free to contact me! Stenciling on walls is an easy, cost-effective project that will bring transformation to your rooms. You can do it!
Stencil: @Royal Design Studio; Sign: @Target; Mug Rack: @DecorSteals
Now, this little space is much happier! Stay tuned for my next blog post which is all about using chalk paint on cabinets!
Happy Stenciling -